This chapter explains the default network configuration and how to change this configuration, and also explains how to use the included network applications. 5.1. Default Network Connection MechanismsIn its default state, the Armadillo is configured to have an IP address assigned to it automatically with either DHCP or Zeroconf so that it can connect to the network. The PC side network connection must also be configured so that it too correctly connects to the same network as the Armadillo. When the Armadillo automatically connects to the network, it first attempts to use DHCP. When a DHCP server is present on the network, an IP address is assigned to the Armadillo in accordance with the response from the DHCP server. If the PC also uses DHCP in the same way, it will by default connect to the same network as the Armadillo. 5.1.2. Zeroconf ConnectionsIf no DHCP server is found, the Armadillo uses a mechanism called Zeroconf (IPv4LL) to assign an IP address. To connect with an Armadillo configured this way, the PC must connect to the same network. If Zeroconf is also used on the PC side, it of course can do so without problem. Note: Zeroconf is called Automatic Private IP Addressing (APIPA) in Windows. Zeroconf uses an address from a specific range (169.254.0.1 - 169.254.255.254) with a subnet mask of 255.255.0.0. This IP address block is reserved by IANA (Internet Assigned Numbers Authority). It is also possible to connect to a Zeroconf network by configuring a static IP address. The PC can connect to the same network by using an IP address from the 169.254.0.1 - 169.254.255.254 range with a subnet mask of 255.255.0.0. While it is possible that a static IP address selected at random will overlap with the one selected by the Armadillo, this will not be a problem. As the Zeroconf on the Armadillo will detect transmission from another host using the same IP address and quickly change its own IP address, the Armadillo and PC will be able to differentiate each other after a brief period of time. 5.2. Changing Network ConfigurationThe following explains how to change the network settings on the Armadillo. ![[警告]](images/warning.png) | |
|---|
Please consult a network administrator for help with network connections. |
5.2.1. Using a Web Browser to Change Network ConfigurationIt is possible to change the various network options using a Web browser. Refer to 「AT Admin: System - Network」 for information on how to make the changes. 5.2.2. Logging In to Change Network ConfigurationBoot-time network configuration can be changed by editing the appropriate file under /etc/config and saving it to the config region. Refer to 11章Config Region - Configuration File Storage for details on saving to the config region. 5.2.2.1. Using a Static AddressIn order to set the options shown in 表5.1「Static IP Address Configuration Example」, use the vi editor to change the content of the /etc/config/interfaces file in the same way as shown in 図5.1「Static IP Address Configuration」. 表5.1 Static IP Address Configuration Example | Item | Configuration |
|---|
| IP Address | 192.168.10.10 | | Netmask | 255.255.255.0 | | Network Address | 192.168.10.0 | | Broadcast Address | 192.168.10.255 | | Default Gateway | 192.168.10.1 |
In order to use DHCP, use the vi editor to change the content of the /etc/config/interfaces file in the same way as shown in 図5.2「DHCP Configuration」. 5.2.2.3. Specifying A DNS ServerTo specify a DNS server, use the vi editor to edit /etc/config/resolv.conf. 5.2.3. Checking The ConnectionThe following shows how to check whether or not transmission is possible with the changed IP configuration. First, enable the new configuration. This is not required if the settings were saved to the config region and the system rebooted. Use ping to try to communicate with another host on the same network. A simple firewall is enabled on the Armadillo. To display the current configuration, execute the command shown in 図5.6「iptables」. 5.4. Network ApplicationsThe following explains how to operate the network related applications included in the factory default userland. It is possible to login from another PC via the network and perform remote operations. The username shown in 表5.2「Username for Telnet Login」 can be used to login. 表5.2 Username for Telnet Login | Username | Password |
|---|
| guest | None |
Telnet can be used to remotely login to another PC. To use telnet, execute the command as shown in 図5.7「telnet」. File transfers can be performed from another PC via the network. The username shown in 表5.3「Username for FTP Login」 can be used to login. 表5.3 Username for FTP Login ftp can be used to transfer files with another PC. To use ftp, execute the command as shown in 図5.8「ftp」. It is possible to login from another PC via the network and safely perform remote operations. The ssh server is set to not start automatically at boot time. To start the ssh server, execute the command as shown in 図5.9「Starting sshd」. | |
|---|
A public key is required in order to use sshd. This key will be generated automatically if it does not exist, a process which takes a number of minutes to perform. |
For the username that can be used for login, refer to 表5.4「Username for ssh Login」. 表5.4 Username for ssh Login | Username | Password |
|---|
| guest | None |
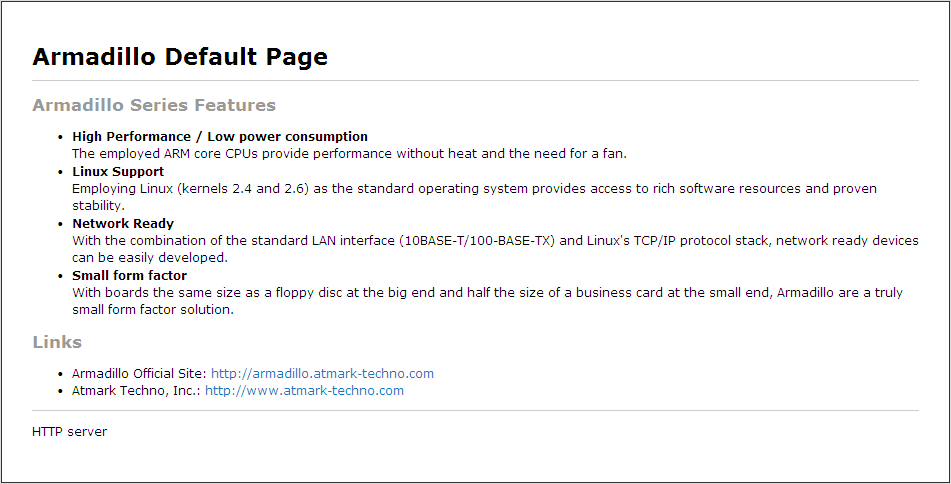
ssh can be used to safely login to another PC. To use ssh, execute the command as shown in 図5.10「ssh」. A Web server runs on the Armadillo. The Web server's top page will be displayed when the URL of the Armadillo (http://[Armadillo's IP address])[] is accessed from a Web browser. The NTP (Network Time Protocol) client can be used to obtain time information from a time server. Execute the command as shown in 図5.11「ntpclient」. The SMTP (Simple Mail Transfer Protocol) client can be used to send email. Execute the command shown in 図5.12「mail」. | |
|---|
It will not be possible to send email if the current hostname is not specified in the /etc/hosts file. Execute the following command to check the current configuration.
|
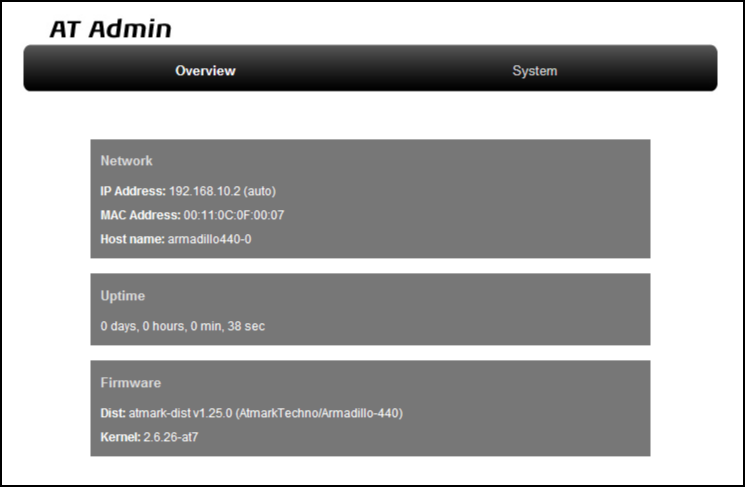
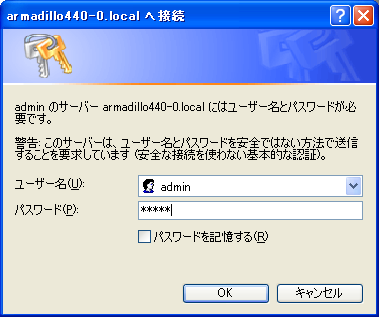
It is possible to perform network configuration and firmware management from a Web browser. 5.4.7.1. AT Admin: Admin ScreenThe top page of at-cgi as shown in 図5.14「AT Admin: Overview」 will be displayed in the Web browser upon accessing http://[Armadillo's IP address]/index.cgi. The top page of at-cgi is AT Admin's "Overview." "Overview" and "System" are available in AT Admin. These two functions are always displayed in the menu at the top of the page. Each one can be selected by clicking on the title. 5.4.7.2. AT Admin: AuthorizationAuthorization is required upon selecting "System" in AT Admin. A sub-window like that shown in 図5.15「AT Admin: System Username / Password Authorization」 will be displayed at this time. The default username and password are as shown below. Enter the username and password and press the OK button. If authorization is successful, the selected screen will be displayed. 5.4.7.3. AT Admin: OverviewThe following explains each part of the Overview screen. Three main groups of information are displayed in the Overview. In Network, a summary of the current network configuration is displayed. The following three items are shown. - IP Address
The current IP address is shown here. When "(auto)" is displayed after the IP address, this indicates that an IP address has been automatically configured with either DHCP or Zeroconf. When "(static)" is displayed, this indicates that a static IP address has been set. - MAC Address
The assigned unique MAC address is shown here. - Host name
The configured hostname is shown here. This is armadillo440-0 by default.
The time that has past since the Armadillo was booted is shown here. It is displayed as: days, hours, min, sec. The current firmware is displayed here. - Dist
The version and profile name of the distribution is shown here. - Kernel
The version of the Linux kernel is shown here.
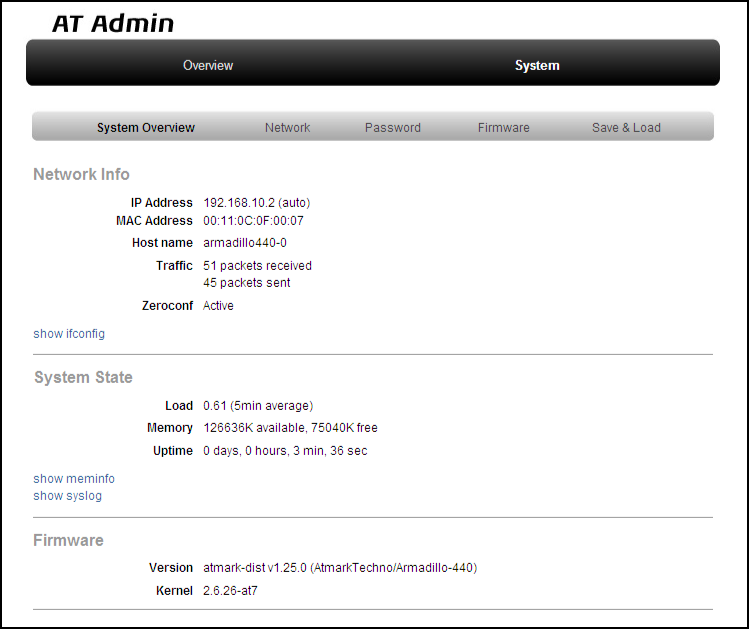
5.4.7.4. AT Admin: System5.4.7.4.1. AT Admin: System - System OverviewConfiguration information related to the Armadillo can be checked on the System Overview. Three main groups of information are displayed here. Network Info System State Firmware
5.4.7.4.1.1. Network InfoNetwork configuration details are shown in Network Info. - IP Address
The current IP address is shown here. The meaning of the text displayed after the IP address is as shown below. - MAC Address
The unique MAC address assigned to the Armadillo is shown here. - Host name
The configured hostname is shown here. This is armadillo440-0 by default. - Traffic
The number of packets sent and received via the network since the system was booted is shown here. - Zeroconf
Whether Bonjour device detection is enabled or not is shown here.
It is possible to obtain more detailed network information from "show ifconfig." The Show ifconfig page displays the output of the ifconfig command as is. For details on the display content, refer to the ifconfig manual. 5.4.7.4.1.2. System StateIt is possible to check the following three items related to the current system state. - Load
The system load state (Load Average) is shown here. - Memory
Memory usage state is shown here. - Uptime
The time that has past since the Armadillo was booted is shown here.
Also, with "show meminfo" and "show syslog," it is possible to check the state of the meminfo information and system log file as is. The current firmware is displayed here. - Dist
This is information on the distribution and current profile in use. The version and type of the userland (applications) software is shown here. - Kernel
The version of the Linux kernel is shown here.
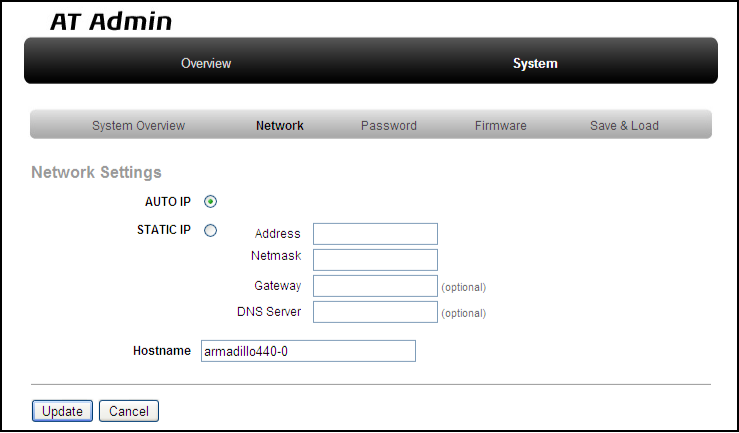
5.4.7.4.2. AT Admin: System - NetworkChanges to various network related configuration options can be carried out on the Network screen. There are two main areas of configuration on the Network screen. - AUTO IP
Select to have an IP address acquired and set automatically. This is selected by default. DHCP is used if a DHCP server is found on the network. If a DHCP server is not found, Zeroconf is used to automatically assign an address. For more details, refer to 5章Network. - STATIC IP
Select to set a static IP address. The following details must be configured manually. - Address
Enter the IP address. - Netmask
Enter the subnet mask - Gateway
Enter the IP address of the gateway server. Leave it blank if a gateway is not being used. - DNS Server
Enter the IP address of a DNS (Domain Name System) server. Leave it blank if DNS is not being used.
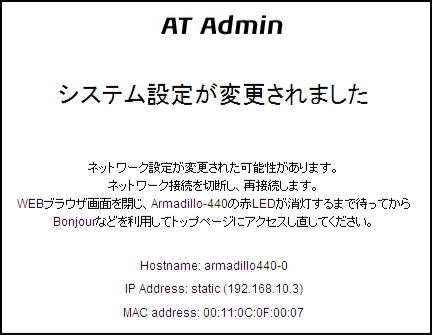
Changes to the hostname are made here. To change the hostname, enter the new name into the textbox. By default, this is set to "armadillo440-0." With Bonjour, this name is combined with the default network name ".local" to give the Armadillo the default name of "armadillo440-0.local." This name can be used with a Web browser. For more details, refer to 「Bonjour Hostnames」. After entering the changes, press the "Update" button and a screen similar to the following will be displayed after which the Armadillo will begin to operate with the new network configuration. The red LED on the Armadillo will activate while the network configuration is being updated and deactivate a few seconds later. After confirming that the LED has deactivated, access the top page on the Armadillo. | |
|---|
Just updating the network configuration does not save the changes. In order to save the changes so that they remain in effect after the next boot, the configuration must be saved to flash memory. Refer to 「AT Admin: System - Save & Load」 for information on saving. |
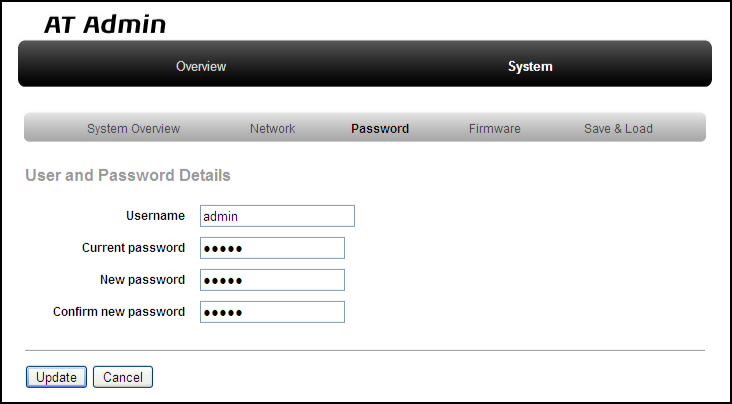
5.4.7.4.3. AT Admin: System - PasswordChanges to the username and password used for authorization of the Packet Scan and System screens can be made on the Password screen. 5.4.7.4.3.1. User and Password Details- Username
Enter the administrator username. This is set to "admin" by default. - Current password
Enter the current password for confirmation. This is set to "admin" by default. - New password
Enter the new password. - Confirm new password
Enter the new password once more for confirmation.
5.4.7.4.3.2. Updating Userland and Password ConfigurationAfter entering the changes, press the "Update" button to update the configuration. | |
|---|
Just updating the configuration does not save the changes. In order to save the changes so that they remain in effect after the next boot, the configuration must be saved to flash memory. Refer to 「AT Admin: System - Save & Load」 for information on saving. |
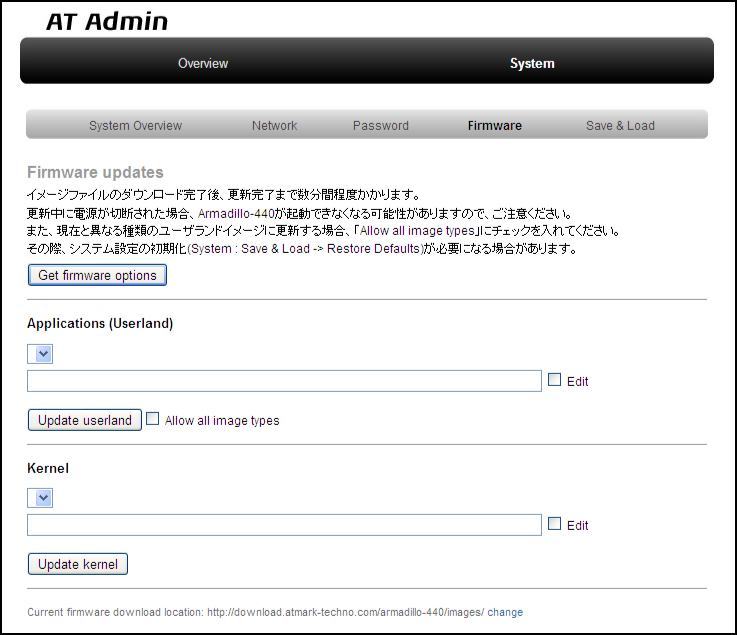
5.4.7.4.4. AT Admin: System - FirmwareThe userland (applications) and Linux kernel firmware can be updated on the Firmware screen. To update to the image files available from the official web site[], first press the "Get firmware options" button. The available image files will be displayed in the "Applications (Userland)" and "Kernel" boxes. 5.4.7.4.4.1. Applications (Userland)Userland (applications) updates are performed here. - Image Selection Box
Userland images available on the server are shown here. Select the preferred image. - URL Input Box
The URL of the userland image file to be downloaded is displayed here. A URL can be entered directly into this box by enabling the "Edit" checkbox to the right. ![[ティップ]](images/tip.png) | |
|---|
If the "Edit" checkbox is enabled, the path specified in the URL input box will be used and the image selected in the image selection box ignored. |
Press the "Update userland" button and the userland image will be downloaded and written to flash memory. To update to a userland image model different to that of the current image, enable the "Allow all image types" checkbox before pressing the "Update userland" button. Linux kernel updates are performed here. - Image Selection Box
Kernel images available on the server are shown here. Select the preferred image. - URL Input Box
The URL of the Linux kernel image file to be downloaded is displayed here. A URL can be entered directly into this box by enabling the "Edit" checkbox to the right. | |
|---|
If the "Edit" checkbox is enabled, the path specified in the URL input box will be used and the image selected in the image selection box ignored. |
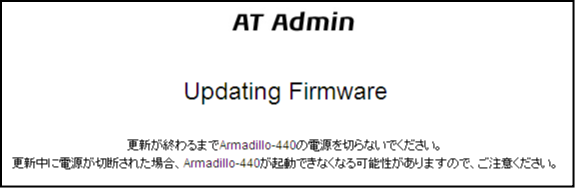
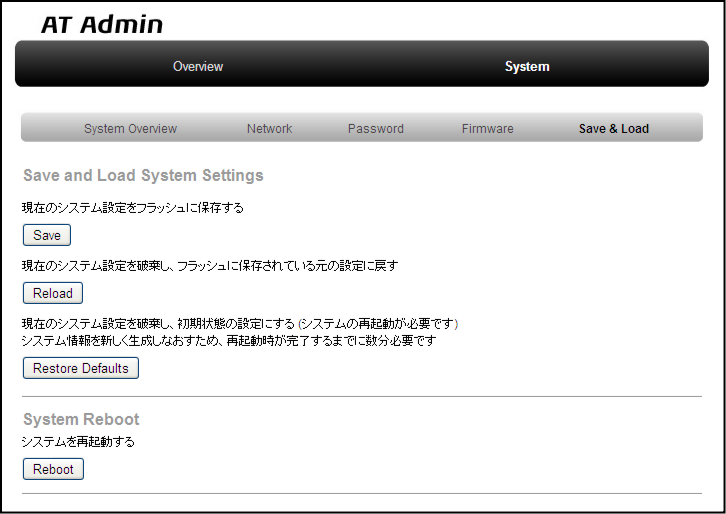
Press the "Update kernel" button and the Linux kernel image will be downloaded and written to flash memory. 5.4.7.4.4.3. Image UpdatesAfter pressing "Update userland" or "Update kernel," 図5.21「AT Admin: System - Updating Firmware」 will be displayed. Do not disconnect the Armadillo's power supply while the firmware is being updated. If the power is disconnected before the update completes, the Armadillo may no longer boot correctly. Once the update has completed, the Firmware screen shown in 図5.20「AT Admin: System - Firmware」 will be displayed. To update another image, make the necessary selections and press the relevant update button again. After updating to a different type of firmware the configuration files must be initialized. For information on the initialization of configuration files, refer to 「AT Admin: System - Save & Load」. After all updates have been completed, reboot the Armadillo to start using the new firmware. Refer to 「AT Admin: System - Save & Load」 for information on rebooting from AT Admin. 5.4.7.4.5. AT Admin: System - Save & LoadSystem configuration can be saved to flash memory, reloaded or initialized, and the system rebooted on the Save & Load screen. 5.4.7.4.5.1. Save & Load System SettingsSystem configuration can be saved to flash memory or loaded here. - Save current configuration to flash memory (Save)
Save configuration such as that set in "Network Settings" and "Password" to flash memory. The saved configuration will remain in effect even after the Armadillo is rebooted. - Discard current system configuration and load the configuration saved in flash memory (Reload)
Discard the current configuration and restore the configuration saved in flash memory to return to the previous state. After a screen similar to that shown below is displayed, the Armadillo will begin to operate with the new (that read from flash memory) network configuration.
If the network connection is changed as a result of restoring the previous configuration, the red LED on the Armadillo will activate. After confirming that the LED has deactivated, access the top page on the Armadillo. - Discard current system configuration and load the default configuration (Restore Defaults)
Discard the current configuration and restore the default configuration for the currently running firmware. The configuration saved in flash memory will also be initialized.
5.4.7.4.5.2. System RebootThe system can be rebooted here. - Reboot the system (Reboot)
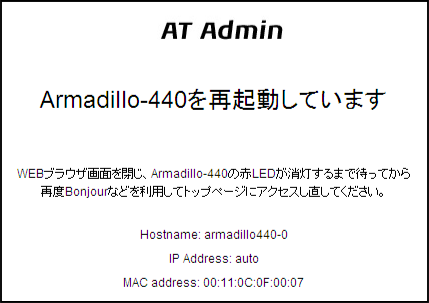
This reboots the Armadillo. Approximately 10 seconds after 図5.24「AT Admin: System - Reboot」 is displayed, the Armadillo will shutdown and then restart.
After rebooting, if the network connection has changed the red LED on the Armadillo will activate for anywhere between 10 seconds to a number of minutes. After confirming that the LED has deactivated, access the top page on the Armadillo again. As Armadillo supports Bonjour, it is possible to easily find an Armadillo from a PC which also supports Bonjour and is on the same network.[] (Quoted from Apple Inc.'s web site)
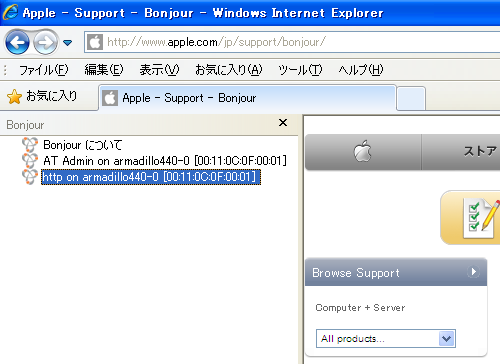
5.5.1. Installing BonjourBonjour for Windows must be installed to use Bonjour on Windows. As third-party distribution of this software is not permitted, it is not included in the development set. Please download it from Apple Inc.'s web site. Apple - Support - Downloads - Bonjour for Windows Execute the downloaded BonjourSetup.exe file and follow the instructions on the screen to install the software. Bonjour is a standard feature of Max OS X Bonjour can be used on Linux by utilizing Avahi and the nss-mdns library. Please refer to your distribution's documentation for more information. The following demonstrates how to find an Armadillo using Bonjour in a Windows environment. For other operating systems, please refer to the relevant manuals for that environment. Start Internet Explorer on the Windows PC. If Bonjour has been installed, it can be displayed in the Explorer Bar in Internet Explorer (IE). From the menu bar, enable "View (V)" --> "Explorer Bar (E)" --> "Bonjour." Check the contents of the "Bonjour" Explorer Bar on the left side of IE. The first line is a link to a description of Bonjour on Apple Inc.'s web site. Below that, "AT Admin on armadillo440-0 [00:11:0C:XX:XX:XX]" and "http on armadillo440-0 [00:11:0C:XX:XX:XX]" will be displayed. These are links to the Armadillo. Selecting "AT Admin on armadillo440-0 [00:11:0C:XX:XX:XX]" will display the top page of at-cgi in the browser. Refer to 「at-cgi」 for more details. Selecting "http on armadillo440 [00:11:0C:XX:XX:XX]" will display the top page of the web server in the browser. If "http on armadillo440 [00:11:0C:XX:XX:XX]" is not displayed in the Explorer Bar, please refer to 「The Armadillo Cannot Be Found With Bonjour」. If "AT Admin" is not displayed, please correctly configure the PC side network settings by referring to 「Default Network Connection Mechanisms」. The hostname shown with Bonjour will be the same as the hostname configured on the Armadillo (this is set to armadillo440-0 by default). As the Bonjour network name is ".local," the URL opened with Bonjour in the web browser will normally be http://armadillo440-0.local/. However, if two or more hosts with the same hostnames exist on the same network (like when multiple Armadillo are connected in their default state), the number at the end of the hostname will change from the second host onwards. For example, with Armadillo in their default state, the second hostname would be "http://armadillo440-1.local/" and the third "http://armadillo440-2.local/." Please note that in this situation the hostname (as configured in "AT Admin") of the second host onwards will not match its Bonjour hostname. In this situation, the MAC address can be used to identify each individual unit. The MAC address displayed in the Internet Explorer Bonjour list can be compared with the sticker attached to each unit. Refer to 図5.26「"Bonjour" Explorer Bar」. | |
|