この章ではLinuxへVMPlayerをインストールし、ATDEが起動するまでの手順を説明します。
インストールを始める前にインストールに必要なファイルやツールを用意します。
ATDEを使うために以下のものが必要です。
- ATDEイメージ
-
ATDEイメージ (atde2-[version].zip) は、付属CDの/vmwareディレクトリにあります。弊社ダウンロードサイトからも取得できます。
- VMPlayerのアーカイブファイル
-
VMPlayerのアーカイブファイルは、VMPlayerダウンロードサイトから取得できます。お使いのLinuxディストリビューションに合わせて、下記のいずれか1つを選択してご利用ください。
表 3.1. 取得ファイル名
| Linuxディストリビューション | ファイル名 |
|---|
| RedHat系 | VMware-player-version.i386.rpm |
| Debian系 | VMware-player-version.i386.rpm(項3.2.2. 「Debian系ディストリビューションの場合」)でdeb形式に変換) |
| インストーラ非使用 | VMware-player-version.tar.gz |
以降のATDE構築例では、以下ファイルを使用しています。
用意したatde2.zipを任意のディレクトリに展開します。コンソールから以下のコマンドを実行してください。
3.1.3. linux-headersのインストール
VMPlayerのインストールには、linux-headersがインストールされている必要があります。linux-headersは、お使いのkernelと同じバージョンのものをインストールしてください。
以下は、Debian GNU/Linux 4.0でインストールする場合の例です。
ATDEを動作させるために必要なVMPlayerのインストール手順を説明します。
3.2.1. RedHat系ディストリビューションの場合
VMware-player.i386.rpmを使ってインストールします。
2行目のコマンド実行後は図 3.6. 「VMPlayer設定画面」の画面になります。
3.2.2. Debian系ディストリビューションの場合
VMware-player.i386.rpmをdeb形式に変換します。
図 3.4. 「rpmをdeb形式へ変換」で作成したdebパッケージを使ってインストールします。
2行目のコマンド実行後は図 3.6. 「VMPlayer設定画面」の画面になります。

|
テーマアイコンをインストールするディレクトリを指定します。
|

|
デスクトップメニューの登録先ディレクトリを指定します。
|

|
VMPlayerのアイコンをインストールするディレクトリを指定します。
|

|
vmmonモジュールをリビルドするかを指定します。
|

|
kernelヘッダーファイルのあるディレクトリを指定します。
|

|
vmblockモジュールをリビルドするかを指定します。
|

|
VMPlayerでネットワークに接続するかを指定します。
|

|
VMPlayerでホストOSとIPアドレスを共有するかを答えます。
|

|
の準備をするかを指定します。
|

|
他にの設定をするかを指定します。
|

|
VMPlayerを動かしているマシンを経由してネットワークを使用するかを指定します。
|

|
VMPlayerを動かしているマシンとのネットワークの使用を準備するかを指定します。
|

|
他のネットワークを設定するかを指定します。
|

|
vmnetモジュールをリビルドするかを指定します。
|
![[ティップ]](/files/images/manual/tip.jpg) | |
|---|
|
デフォルトの設定を変更しない場合は、[Enter]キーを入力すればよいでしょう。
|
アーカイブファイルを展開します。
展開したディレクトリにあるインストールスクリプトを使ってインストールします。
|
実行ファイルをインストールするディレクトリを指定します。
|
|
init ディレクトリのあるディレクトリを指定します。
|
|
init スクリプトのあるディレクトリを指定します。
|
|
VMPlayer のデーモンをインストールするディレクトリを指定します。
|
|
VMPlayer のライブラリをインストールするディレクトリを指定します。
|
|
で指定したディレクトリが存在しない場合に作成するかどうか答えます。
|
|
ドキュメントファイルをインストールするディレクトリを指定します。
|
|
で指定したディレクトリが存在しない場合に作成するかどうか答えます。
|
|
VMPlayer の設定を行うかどうかを答えます。
|
|
テーマアイコンをインストールするディレクトリを指定します。
|
|
デスクトップメニューの登録先ディレクトリを指定します。
|
|
VMPlayer のアイコンをインストールするディレクトリを指定します。
|
|
vmmon モジュールをリビルドするかを指定します。
|
|
kernel ヘッダーファイルのあるディレクトリを指定します。
|

|
vmblock モジュールをリビルドするかを指定します。
|
(16) |
VMPlayer でネットワークに接続するかを指定します。
|
(17) |
VMPlayer でホストOS とIP アドレスを共有するか答えます。
|
(18) |
(17)の準備をするかを指定します。
|
(19) |
他に(17)の設定をするかを指定します。
|
(20) |
VMPlayer を動かしているマシンを経由してネットワークを使用するかを指定します。
|
(21) |
VMPlayer を動かしているマシンとのネットワークの使用を準備するかを指定します。
|
(22) |
他のネットワークを設定するかを指定します。
|
(23) |
vmnet モジュールをリビルドするかを指定します。
|
| |
|---|
|
デフォルトの設定で良い場合、 [Enter]キーを入力すればよいでしょう。
|
-
コンソールで次のように入力します。
ここで、VMPlayerが、ライセンス同意書を開こうとしてエラーが発生する場合があります。表示されるエラーメッセージは以下のようなものです。
この場合はコンソールから次のコマンドを実行してください。
-
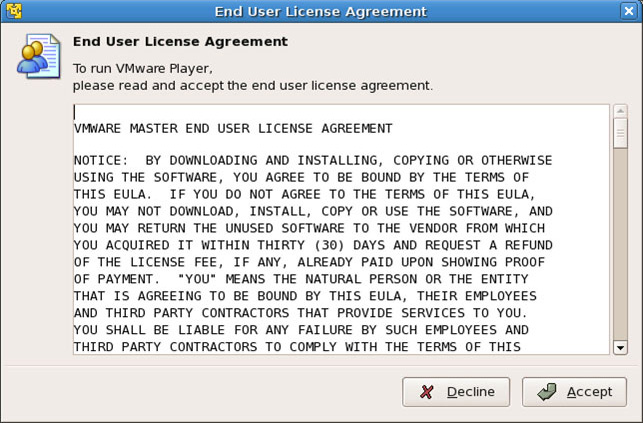
ライセンス同意画面が表示されます。内容を確認し同意する場合は、「Accept」ボタンをクリックしてください。
-
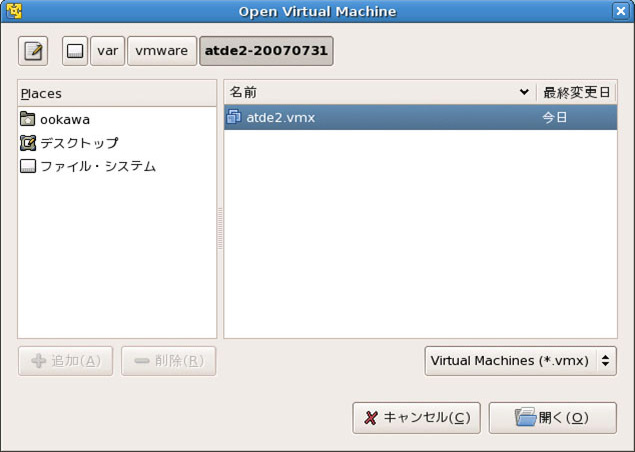
ファイルダイアログが開きます。「3.1.2. ATDEイメージの展開」で展開したatde2ディレクトリにあるatde2.vmxを指定してください。
ログインユーザは、次の2種類が用意されています。デフォルトの設定では、「atmark」で自動ログイン[]します。
表 3.2. デフォルトのユーザ名とパスワード
| ユーザ名 | パスワード | 権限 |
|---|
root | root | rootユーザ |
atmark | atmark | 一般ユーザ |
-
RedHat系ディストリビューションの場合
以下のコマンドを実行します。
-
Debian系ディストリビューションの場合
以下のコマンドを実行します。
-
インストーラ非使用の場合
以下のコマンドを実行します
もしデータが必要ないのであれば、「3.1.2. ATDEイメージの展開」で展開したatde2ディレクトリを削除してください。