第5章 Rewriting Flash Memory
This chapter explains the steps required to rewrite the on-board flash memory on the Armadillo.
There are two main ways to rewrite the flash memory.
Rewriting flash memory by using a downloader program on the work PC to send an image to the target Armadillo.
Rewriting flash memory by having the target Armadillo download an image file from a remote server.
The first method is explained in 「Rewriting Flash Memory With A Downloader」. The second method is then explained in 「Rewriting Flash Memory With tftpdl」 and 「Rewriting Flash Memory With netflash」.
![[警告]](images/warning.png) | |
|---|
If for some reason flash rewriting fails, the software on the Armadillo may no longer be able to boot properly. Be sure to pay attention to the following points when rewriting flash. If the Armadillo can no longer be booted after a rewrite of the bootloader has failed, please follow the steps listed in 「Restoring Bootloader to Factory State」 to restore the bootloader. |
5.1. Flash Memory Writing Regions
The flash memory address to be written to can be specified by region name. The image files to be specified for each region are shown in 表5.1「Region Names and Corresponding Image Files」.
表5.1 Region Names and Corresponding Image Files
| Product | Region Name | File Name |
|---|
| Armadillo-440 LCD Model | bootloader | loader-armadillo4x0-[version].bin |
| kernel | linux-a400-[version].bin.gz |
| userland | romfs-a440-[version].img.gz |
| Armadillo-420 Basic Model | bootloader | loader-armadillo4x0-[version].bin |
| kernel | linux-a400-[version].bin.gz |
| userland | romfs-a420-[version].img.gz |
![[ティップ]](images/tip.png) | |
|---|
Armadillo-420 and Armadillo-440 both use the same bootloader and kernel image files. |
5.2. Installing Downloader
The downloader program is installed on the work PC.
There are multiple types of downloader, as listed in 表5.2「Downloader List」.
表5.2 Downloader List
| Downloader | Operating System | Description |
|---|
| Hermit-At Downloader | Linux | This is a CUI application for Linux. |
| Shoehorn-At | Linux | This is a CUI application for Linux. |
| Hermit-At Win32 | Windows | This is a GUI application for Windows. |
| |
|---|
The downloader package is pre-installed in ATDE (Atmark Techno Development Environment), so there is no need to install it separately. |
Install the package files contained in the downloader/ directory on the included DVD.
Extract the contents of the hermit-at-win_[version].zip archive stored in the downloader/ directory on the included DVD to an appropriate folder.
5.3. Rewriting Flash Memory With A Downloader
The following explains how to rewrite flash memory with the Hermit-At Downloader and Hermit-At Win32.
The Hermit-At Downloader and Hermit-At Win32 work in cooperation with the bootloader on the Armadillo to rewrite the flash memory from the work PC.
Boot the Armadillo in maintenance mode by appropriately setting the jumpers as shown in 表2.8「Jumper Settings」 and then powering the board on.
Ensure that the serial interface on the work PC that is connected to the Armadillo is not being used by another application. If another application is using the serial interface, please either close the connection or close the application in order to free the interface.
On Linux, execute the hermit-at command as shown in 図5.2「Download Command」.
The download option is a sub-command of hermit-at. The --input-file option is used to specify the file to be written to flash. The --region option is used to specify the region to be written to. Therefore in the following example linux.bin.gz will be written to the kernel region.
If using a serial interface other than ttyS0, the port must be specified with the --port option as shown in 図5.3「Download Command (With Port Option)」[].
The bootloader region has a simple protection mechanism to prevent mistaken rewrites. To rewrite the bootloader region, override the protection mechanism by using the --force-locked option as shown in 図5.4「Download Command (Unprotected)」[].
| |
|---|
If an incorrect image is written to the bootloader region, it will no longer be possible to boot from on-board flash memory. If this does occur, restore the bootloader by referring to 「Restoring Bootloader to Factory State」. |
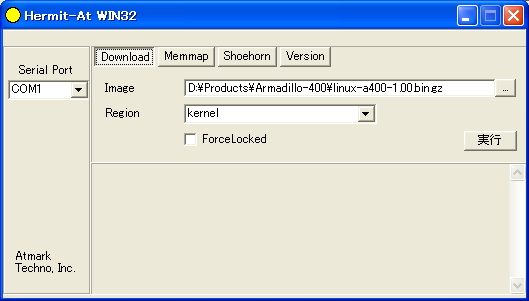
For Windows, execute hermit.exe. The window shown in 図5.5「Hermit-At Win32: Download Window」 will appear.
Under "Serial Port", select the serial interface connected to the Armadillo. If a drop-down list is not displayed, please enter the port name directly.
For "Image", specify the image to be written and for "Region", specify the region to be written to. If specifying the all or bootloader regions, "Force Locked" must be selected.
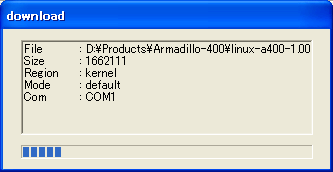
After all configuration is complete, click the Execute button to start the writing. The download progress is displayed in a dialog box as shown in 図5.6「Hermit-At Win32: Download Dialog」 while the image is being written to flash.
The dialog box will close once the download has finished.
5.4. Rewriting Flash Memory With tftpdl
The following explains how to rewrite flash memory by having the target Armadillo download an image from a remote server.
Using the tftpdl function of the Hermit-At bootloader is a faster way to rewrite flash memory than using a downloader program.
The tftpdl function gives the Armadillo the ability to download an image made available by a TFTP server on the same network and then write the image to its own flash memory.
| |
|---|
A TFTP server (atftpd) is started by default on ATDE v3.0 and later. Files placed in the /var/lib/tftpboot/ directory will be accessible via TFTP. |
In order to use the tftpdl function, first configure the jumpers on the target Armadillo for maintenance mode and boot the board.
Use the serial console program on the work PC to enter the tftpdl command. In the example shown in 図5.7「tftpdl Command Example」, the Armadillo's IP address is set to 192.168.10.10 and linux.bin.gz from a TFTP server with the IP address of 192.168.10.1 is written to the kernel region.
The bootloader, kernel and userland regions can be specified for rewriting. The region names and their corresponding options are shown in 表5.3「Region Names and Corresponding Options」.
表5.3 Region Names and Corresponding Options
| Region | Option |
|---|
| Bootloader | --bootloader |
| Kernel | --kernel |
| Userland | --userland |
5.5. Rewriting Flash Memory With netflash
It is possible to rewrite flash memory with the netflash application once the Armadillo has booted into Linux.
The netflash command gives the Armadillo the ability to download an image made available by a HTTP or FTP server on the same network and then write the image to its own flash memory.
| |
|---|
A HTTP server (lighttpd) is started by default on ATDE v3.0 and later. Files placed in the /var/www/ directory will be accessible via HTTP. |
In order to use the netflash command, first login to the Armadillo and then execute the command as shown in 図5.8「netflash Command Example」.
The "-r [device-file-name]" option is used to specify the region to be written to. Please refer to 表5.4「Region Names and Corresponding Device Files」 for the device file names. Details on other options can be found by executing netflash -h.
表5.4 Region Names and Corresponding Device Files
| Region | Device File |
|---|
| Kernel | /dev/flash/kernel |
| Userland | /dev/flash/userland |
| |
|---|
As the device file of the bootloader region is read-only by default, it cannot be rewritten with netflash. |
5.6. Restoring Bootloader to Factory State
If for some reason the contents of the bootloader region have been damaged and the bootloader no longer functions properly, the bootloader can be restored to factory state by using the UART boot mode.
Configure the jumpers on the Armadillo for UART boot mode by referring to 表2.8「Jumper Settings」, but do not boot the Armadillo at this stage.
Ensure that the serial interface on the work PC that is connected to the Armadillo is not being used by another application. If another application is using the serial interface, please either close the connection or close the application in order to free the interface.
Execute the command[] in 図5.9「shoehorn Command Example」 and then power on the Armadillo.
After executing the command the log shown in 図5.10「shoehorn Command Log」 will be displayed.
A successful execution of the shoehorn command will result in the UART boot mode version of the Hermit At bootloader (loader-armadillo4x0-boot-[version].bin) being loaded on the Armadillo. With the Armadillo in this state, refer to 「Rewriting Flash Memory With A Downloader」 to write the bootloader image to flash memory.
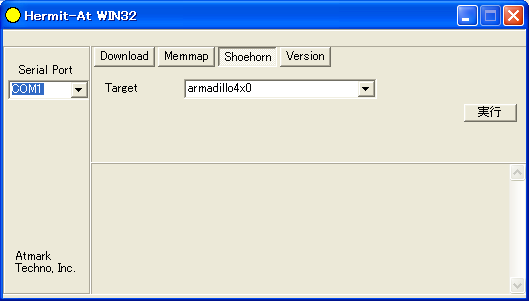
Execute hermit.exe and click on the Shoehorn button. The window shown in 図5.11「Hermit-At Win32: Shoehorn Window」 will appear.
Select armadillo4x0 for the target and click the execute button.
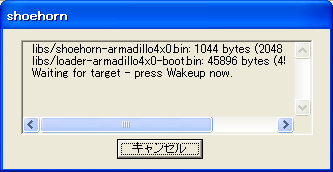
After the dialog box appears, power on the Armadillo. The dialog box will then close automatically once the Armadillo is ready for downloading.
With the Armadillo in this state, refer to 「Rewriting Flash Memory With A Downloader」 to write the bootloader image to flash memory.