The following explains how to make kernel and userland images from the source code based distribution Atmark-Dist and the Linux kernel source code.
6.1.2. Applying Default Configuration
Atmark-Dist should then be configured for the target Armadillo. As the Linux kernel is managed by Atmark-Dist, once Atmark-Dist has been configured appropriately the correct kernel configuration will be applied automatically.
Start the configuration by entering the commands shown in the following example[].
[PC ~/atmark-dist]$ make config
First, you will be asked to select a vendor. Please enter "AtmarkTechno".
[PC ~/atmark-dist]$ make config
config/mkconfig > config.in
#
# No defaults found
#
*
* Vendor/Product Selection
*
*
* Select the Vendor you wish to target
*
Vendor (3com, ADI, Akizuki, Apple, Arcturus, Arnewsh, AtmarkTechno, Atmel, Avnet, Cirrus, Cogent, Conexant, Cwlinux, CyberGuard, Cytek, Exys, Feith, Future, GDB, Hitachi, Imt, Insight, Intel, KendinMicrel, LEOX, Mecel, Midas, Motorola, NEC, NetSilicon, Netburner, Nintendo, OPENcores, Promise, SNEHA, SSV, SWARM, Samsung, SecureEdge, Signal, SnapGear, Soekris, Sony, StrawberryLinux, TI, TeleIP, Triscend, Via, Weiss, Xilinx, senTec) [SnapGear] (NEW) AtmarkTechno
Next, you will be asked to select a product name. Please select the appropriate product name from 表6.1「Product Name List」.
表6.1 Product Name List
| Product | Product Name | Notes |
|---|
| Armadillo-440 LCD Model | Armadillo-440 | Factory Image |
| Armadillo-420 Basic Model | Armadillo-420 | Factory Image |
Armadillo-440 is used in the example below.
* * Select the Product you wish to target * AtmarkTechno Products (Armadillo-210.Base, Armadillo-210.Recover, Armadillo-220.Base, Armadillo-220.Recover, Armadillo-230.Base, Armadillo-230.Recover, Armadillo-240.Base, Armadillo-240.Recover, Armadillo-300, Armadillo-440, Armadillo-500, Armadillo-500-FX.base, Armadillo-500-FX.dev, Armadillo-9, Armadillo-9.PCMCIA, SUZAKU-V.SZ310, SUZAKU-V.SZ310-SID, SUZAKU-V.SZ310-SIL, SUZAKU-V.SZ310-SIL-GPIO, SUZAKU-V.SZ410, SUZAKU-V.SZ410-SID, SUZAKU-V.SZ410-SIL, SUZAKU-V.SZ410-SIL-GPIO, SUZAKU-V.SZ410-SIV) [Armadillo-210.Base] (NEW)Armadillo-440
You will then be asked to select the development environment. Please enter "default". The armel (EABI) development environment will be used for the Armadillo-400 Series when "default" is selected.
* * Kernel/Library/Defaults Selection * * * Kernel is linux-2.6.x * Cross-dev (default, arm-vfp, arm, armel, armnommu, common, h8300, host, i386, i960, m68knommu, microblaze, mips, powerpc, sh) [default] (NEW)default
Next, enter "None" for which libc to build. By selecting "None", the libc already installed in the development environment (glibc) will be used.
Libc Version (None, glibc, uC-libc, uClibc) [uClibc] (NEW)None
Enter "y" (yes) when asked whether or not to default all settings.
Default all settings (lose changes) (CONFIG_DEFAULTS_OVERRIDE) [N/y/?] (NEW)y
Enter "n" (no) for the final three questions.
Customize Kernel Settings (CONFIG_DEFAULTS_KERNEL) [N/y/?]n
Customize Vendor/User Settings (CONFIG_DEFAULTS_VENDOR) [N/y/?]n
Update Default Vendor Settings (CONFIG_DEFAULTS_VENDOR_UPDATE) [N/y/?]n
Once all options have been entered, the configuration will be saved to the build system and you will be returned to the prompt.
6.1.4. Customizing Images
Atmark-Dist includes a variety of applications and libraries which can be included or removed from an image according to the chosen configuration. It is also possible to alter the kernel configuration.
Use the make menuconfig command to change the Atmark-Dist configuration.
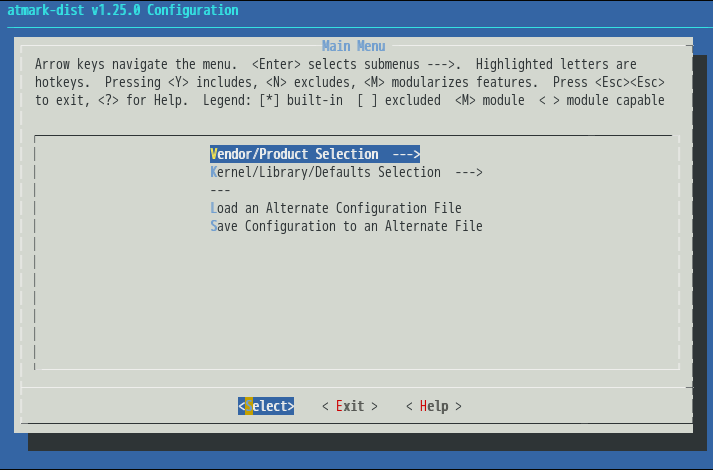
After executing the make menuconfig command, the Main Menu screen as shown in 図6.4「menuconfig: Main Menu」 is displayed.
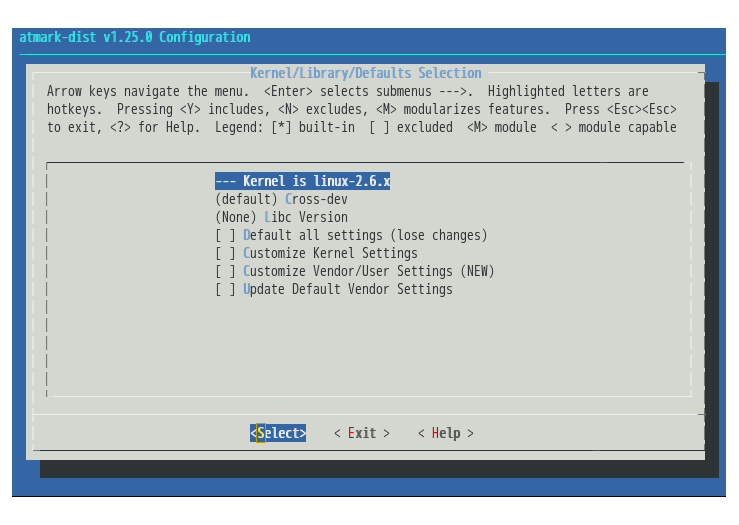
Use the up and down arrow keys to highlight Kernel/Library/Defaults Selection ---> and press enter. The Kernel/Library/Defaults Selection screen will be displayed.
To change the kernel configuration, select Customize Kernel Settings. To change what applications or libraries are included in the userland, select Customize Vendor/User Settings. Each option can be selected by using the up and down arrow keys to highlight the relevant option and then pressing the space bar so that a "*" mark appears before it.
After making the selections, use the left and right arrow keys to highlight Exit and press Enter. You will be taken back to the Main Menu screen.
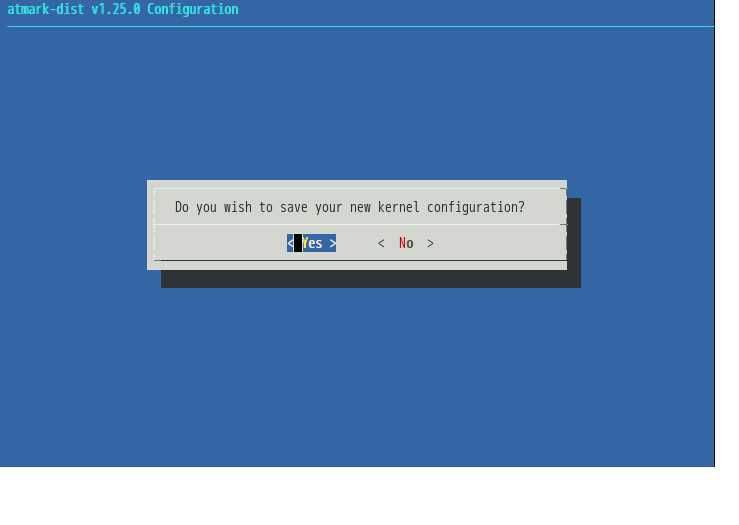
Again in the Main Menu screen highlight Exit and press Enter. The Do you wish to save your new kernel configuration? confirmation screen will then appear. Highlight Yes and press Enter.
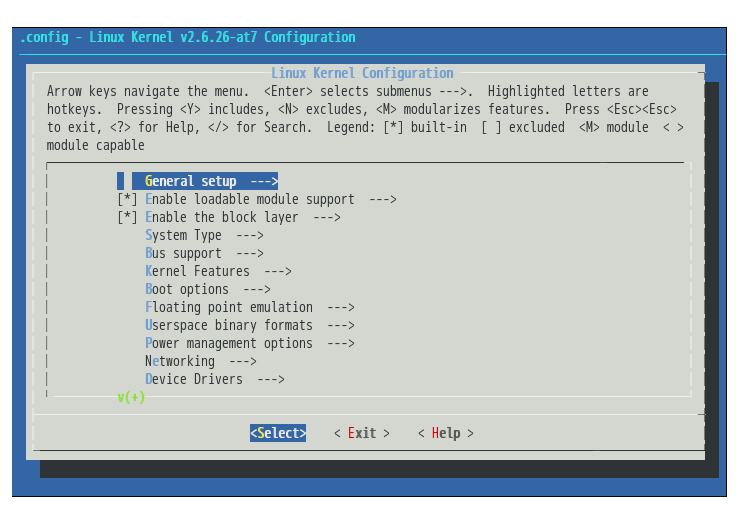
If you had selected the Customize Kernel Settings option, the Linux Kenrel Configuration screen will appear. Changes to the kernel configuration can be made here. After making the required changes, highlight Exit on the Linux Kernel Configuration screen and press Enter to exit.
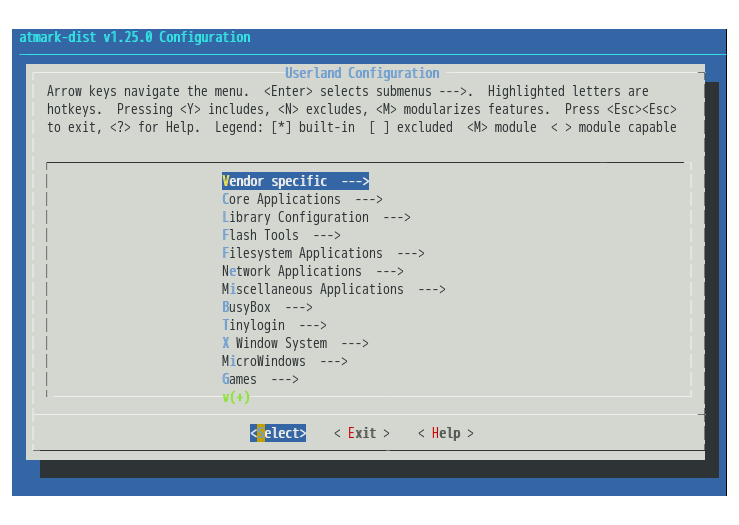
If you had selected the Customize Vendor/User Settings option, the Userland Configuration screen will then appear. Changes to what applications are libraries are included in the userland can be made here. After making the required changes, highlight Exit on the Userland Configuration screen and press Enter to exit.
The Do you wish to save your new kernel configuration? confirmation screen will then appear once again. Highlight Yes and press Enter.
This completes the configuration process.
For more details on the using make menuconfig for configuration, please refer to the "Atmark-Dist Developers Guide".
After the configuration process, use the make command in the same way described in 「Building」 to create images based off the new configuration.


![[警告]](images/warning.png)